Directory Services
Before following the instructions in this topic, be sure to review the topic LDAP/Active Directory.
Prerequisites
Before beginning, ensure that you have obtained the following information:
- Is Active Directory or LDAP used?
-
If AD is used, will it be against Organizational Units or Security Groups?
With LDAP, only Organizational Units can be used.
- The fully qualified domain name of the server that will be used to authenticate against.
- Credentials of an account that has permissions to perform directory lookups.
- If different to the account specified above, credentials of another account that will be used to test with.
This account must be a member of an OU or Security Group. The purpose of the test is to determine which OUs or groups the account belongs to.
Running the Test Harness
The test harness checks whether a connection can be made to the directory services server from MEDIAL and whether groups can be returned. It returns a text file that lists the groups for the test account. You then create one of these groups in MEDIAL to see if the test user can log in.
The test harness must be run on the server that runs MEDIAL to verify communication between that server and the Directory Services Server.
You can download the test harness from a location specified by your system provider. If you do not have the file, contact MEDIAL support.
Test Harness Files
When you unzip the file, the following files reside in the top folder:
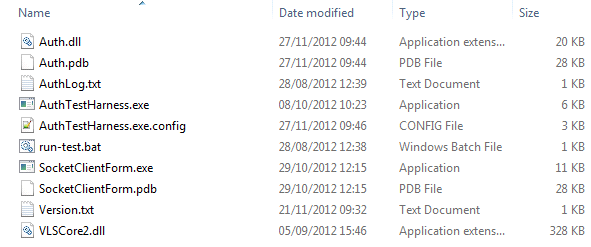
The two files you will need to modify are:
-
AuthTestHarness.exe.config
This file contains the variables used to extract information from the directory and retrieve the groups. You will need to copy these values to the web.config files for the VLS and upload web sites.
-
run-test.bat
This file simulates a user logging on. It creates another file in the same directory called AuthLog.txt that displays the retrieved user information. If the configuration is correct, it will display the groups/OU’s that the user is a member of.
Batch File Setup
Set up the run-test.bat file by opening it in Notepad or any other text editor. Enter the credentials to run the test followed by ADAuth or LDAPAuth depending on which service is use. The syntax is the following:
AuthTestHarness.exe username password ADAuth|LDAPAuth
The following illustration shows the credentials for the account TestUser:

Configuration File
In your text editor, open the file AuthTestHarness.exe.config., which looks like the following example:
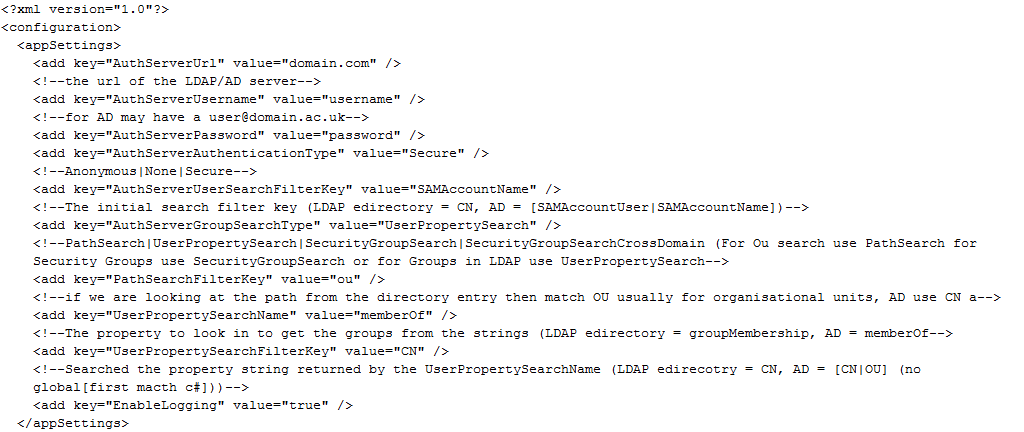
The following table explains the values that need to be configured.
|
Key |
Value |
|---|---|
|
AuthServerURL |
Fully qualified domain name of the directory server to be contacted. |
|
AuthServerUsername |
Username of account that can perform directory lookups. |
|
AuthServerPassword |
Password for the account. |
|
AuthServerAuthenticationType |
Anonymous or None are possibilities, but Secure is the most commonly used value. |
|
AuthServerUserSearchFilterKey |
CN is used for LDAP searches. |
|
AuthServerGroupSearchType |
PathSearch if searching against OU’s. |
|
PathSearchFilterKey |
Leave set to ou because it will be used only when searching against OU’s. |
|
UserPropertySearchName |
groupMembership for LDAP. |
|
UserPropertySearchFilterKey |
CN for LDAP or AD. |
|
EnableLogging |
Leave set to true to see the text file. |
Configuration Example
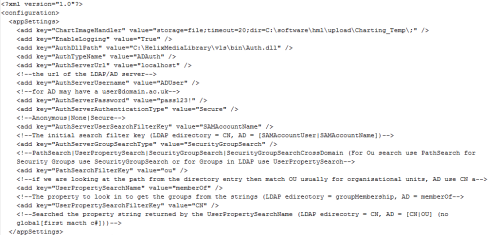
The following is an example of how the AuthTestHarness.exe.config file has been modified to return the Security Groups that the specified users are members of:
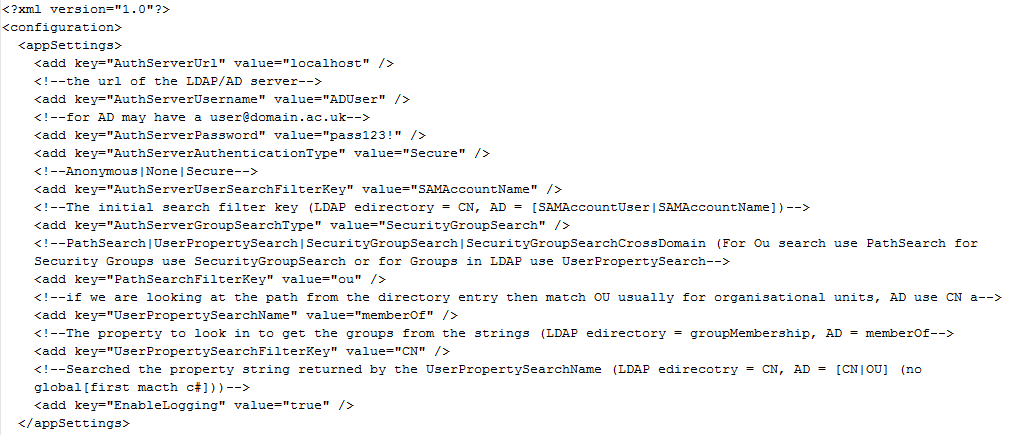
In this example, the localhost address is used because the local machine is the Active Directory server.
Attributes are case-sensitive and must match the directory values exactly. For example, group membership needs to be written as groupMembership, with the M in uppercase.
AD Explorer
It is a good idea to explore the directory to see which attributes are being used and how they are written. The AD Explorer tool makes it easy to see how the search is being performed. For example, the preceding sample configuration asks the directory to return the value and memberships for SAMAccountName. Because the run-test.bat file is set up for TestUser, the group Test Group should be returned.
When you run AD Explorer, it shows an expandable directory tree where you can click on a user to view the user attributes. The following is an example of the information that AD Explorer returns for the user TestUser.
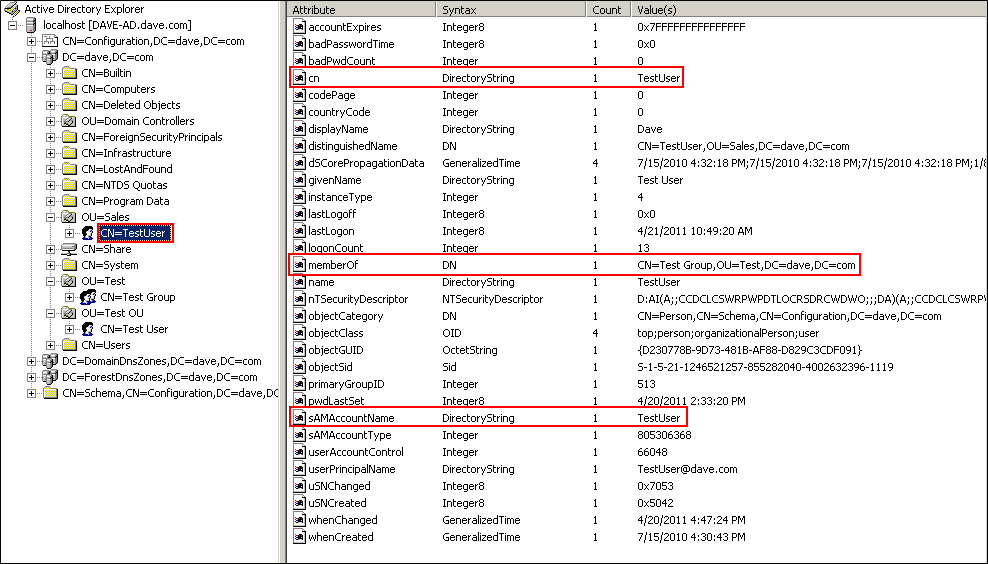
Because the search is being run against Security Groups, the attribute ou can be ignored.
AuthLog File
When you run the prepared batch file, it returns a text file called AuthLog.txt that contains a lot of information. The most important part is the list of groups at the bottom of the file.

When FOUND GROUP appears with one or more groups listed, the configuration is correct and you can enter the integration information into the configuration files. If no groups are found, check that the attributes are entered correctly in the configuration file. Also run AD Explorer to check whether any non-standard attributes are being used.
Installing the Plugin
-
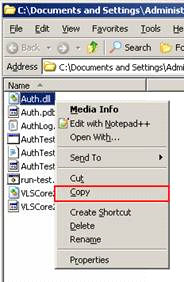
From the test harness file directory, copy the Auth.dll file.
-
Paste this DLL into the bin folder of the vls and upload directories. If the C:\ drive is the default installation location, these folders will be here:
C:\ MediaLibrary\vls\bin
C:\ MediaLibrary\upload\bin
Editing the Web Config Files
The web.config files need to be edited with information from the test harness.
Before editing the congiruation files, back them up in case there is a problem.
VLS Configuration File
-
Open the following file with Notepad or any text editor:
C:\ MediaLibrary\vls directory\web.config
-
Copy the information from the test harness into this file inside of the <appsettings>...</appsettings> XML elements:
<appSettings>
<!--<add key="AuthDLLPath" value=""/>
<add key="AuthTypeName" value=""/>-->
</appSettings>
-
Uncomment the code by removing the <!-- and --> characters shown above in bold. There are two values present within this element that pertain to the DLL. Add the following values inside of the quotation marks:
- For AuthDLLPath, set the full path where the Auth.DLL resides for each site. For configuring the vls web.config file point to the DLL in the \vls\bin\ directory and for the upload site the DLL in the \upload\bin directory.
- For AuthTypeName, set the value to ADAuth if you are using Active directory or LDAPAuth for LDAP integration.
- Below AuthTypeName, copy and paste the information from the test harness configuration file. Copy only the text between the <appsettings></appsettings> tags of the configuration file so that it appears within the existing <appsettings></appsettings elements of the web.config files.
-
When you have set up this information, the vls web.config file looks like this:

Upload Configuration File
Repeat this process for the web.config file in the upload folder. You can copy all of the text from the vls file if you make sure to change the path to the Auth.dll to point to the bin directory of the upload site. For example:
C:\ MediaLibrary\upload\bin\Auth.dll
Testing the Configuration
Test the configuration to ensure that MEDIAL is authenticating against the directory. To do this, create a group in the media library.
- Log in as an administrator and navigate to the Security section on the upload site.
- Add a new group, ensuring that it is written exactly as it appears in the directory as an OU or Security Group. From the preceding example above, the group found was Test Group.
-
Set the group name in MEDIAL, giving it view and upload rights to a category.
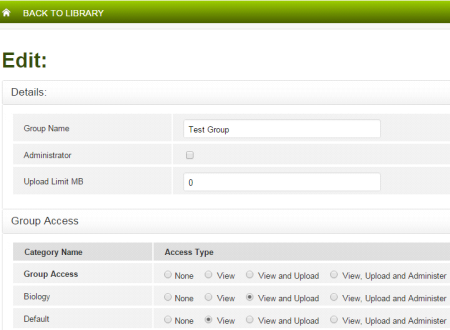
- Save the changes.
- Click Back To Library.
- Log out.
- Log in with the test user account. You should have access to the specified categories.

Troubleshooting the Connection
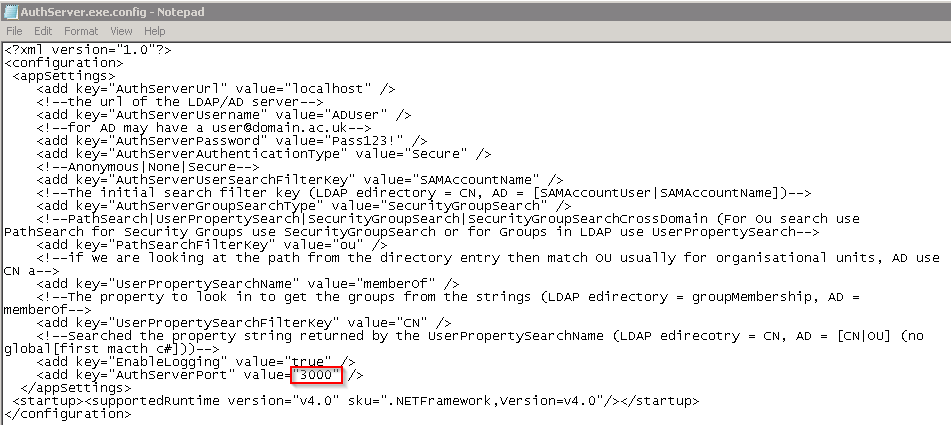
Occasionally the test harness may fail to contact the domain server. If this happens, you can configure the AuthServer.exe component to allow access over a port, specified in the AuthServer.exe.config file.
Accessing Directory Services over a Defined Port
-
You need to configure AuthServer.exe with the same values as the AuthTestHarness.exe.config file. The preceding configuration example uses the following values for AuthTestHarness.exe.config:
<add key="AuthServerUrl" value="localhost" />
<add key="AuthServerUsername" value="ADUser" />
<add key="AuthServerPassword" value="Pass123!" />
<add key="AuthServerAuthenticationType" value="Secure" />
<add key="AuthServerUserSearchFilterKey" value="SAMAccountName" />
<add key="AuthServerGroupSearchType" value="SecurityGroupSearch" />
<add key="PathSearchFilterKey" value="ou" />
<add key="UserPropertySearchName" value="memberOf" />
<add key="UserPropertySearchFilterKey" value="CN" />
-
Open the AuthTestHarness.exe.config file with a text editor and find these attributes:
- EnableLogging
- ForwardToAuthServer
- AuthServerPort
-
Choose an unused port that can be ongoing for directory services authentication, and change the attribute values to the following. In this example, 3000 is the port selected for contacting directory services:
<add key="EnableLogging" value="true" />
<add key="ForwardToAuthServer" value="true" />
<add key="AuthServerPort" value="3000" />
- Save and close the AuthTestHarness.exe.config file.
-
Open the AuthServer.exe.config file and enter values to match the ones in AuthTestHarness.exe.config, including the same port number. It will look like the following:

- Double click AuthServer.exe to start the application.
- Run the run-test.bat file to perform the directory lookup over the specified port. If groups are returned, the configuration can be implemented.
Creating a Scheduled Tasks
You also need to create a scheduled task to ensure that the AuthServer.exe application remains running on the server.
-
Copy the AuthServer.exe file and place it in a desired location on the server. For example, create a directory such as:
C:\AuthServer\
-
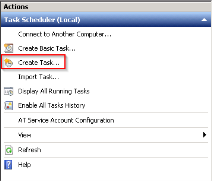
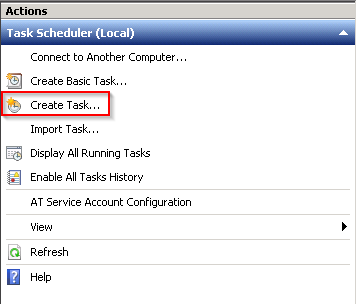
Click Start > Administrative Tools > Task Scheduler. At the right of the window choose Create Task.
-
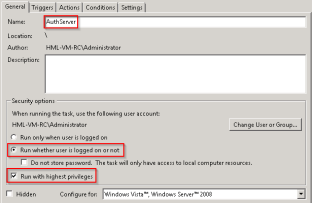
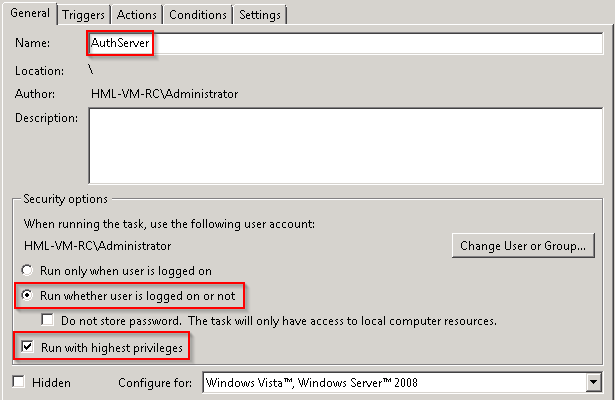
On the General tab, enter a task name and set the task to run with highest privileges regardless of whether a user is logged on.
-
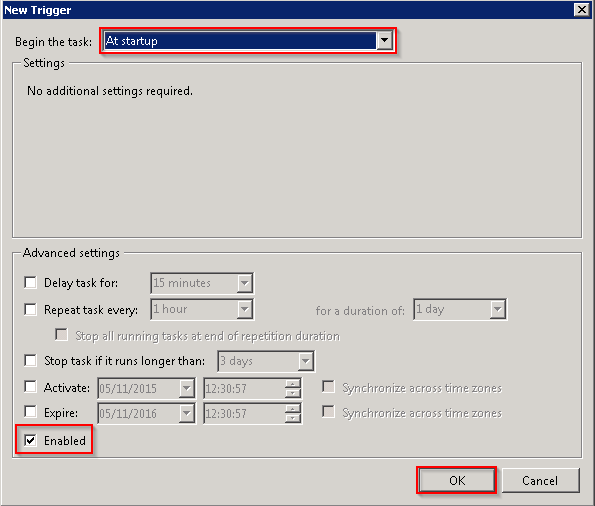
On the Triggers tab click New. In the drop-down box, select At startup and ensure that the task is enabled. Click OK.

-
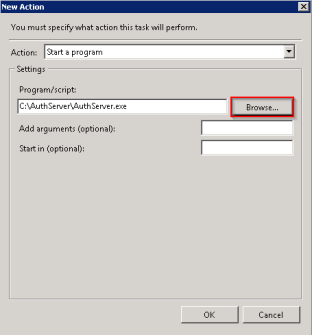
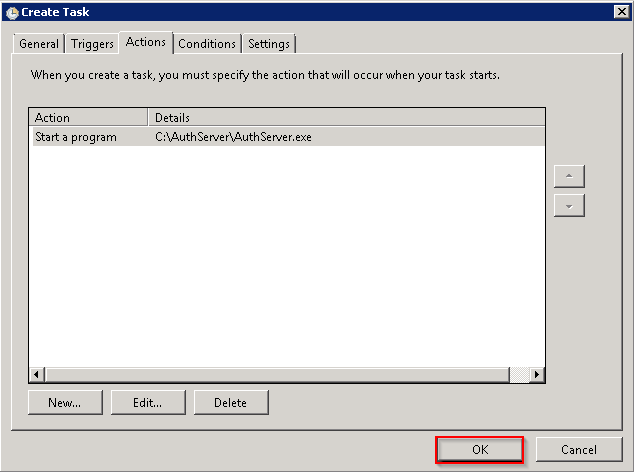
On the Actions tab, click New and leave the action set to Start a program. Click Browse and locate AuthServer.exe. Click OK and OK again to close the window.
-
Click OK to create the scheduled task.

-
In the credentials box, enter the password for the account to use and save the task.
Ensure that the account won’t be disabled or its password changed. Either of these actions will cause the scheduled task to fail.
-
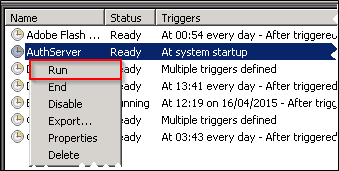
Because the task is set to run on system startup, it needs to be started manually at first. Locate it in the task scheduler library.

-
Right-click it and select Run.
-
Exit Task Scheduler and test authentication in MEDIAL.


|
©2025 Streaming Ltd | |