Playing Media
The MEDIAL administrator can disable certain features on the playback pages, so you may not have access to all of the features described in this topic.
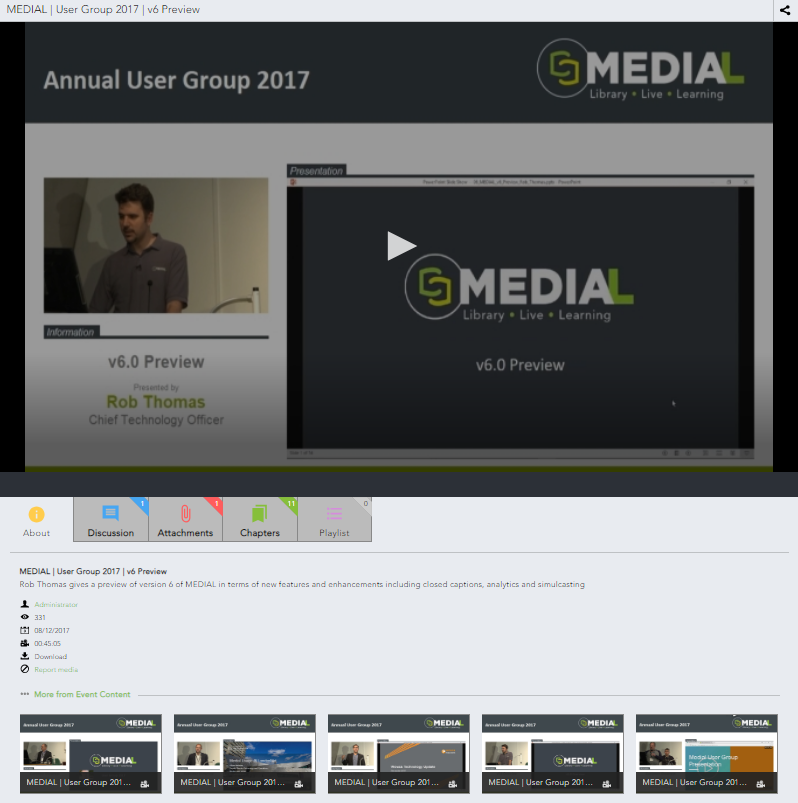
Playback Page Features
Each playback page for a media item may contain the following elements:
- Video playback in Player (more about the player controls).
-
Share. Share the clip on Facebook, Twitter, or through email.

- Download. When enabled, this allows the clip to be downloaded.
- Rate this media. A clip can be rated by clicking on one of the stars next to rate:
- Flag as inappropriate. Clicking this reports the media clip to the system administrator. The clip is hidden from view until approved by the administrator. A box appears asking for a reason for reporting the clip.
- More from... Links to clips within the same category or any other related metadata.
- Attachments. Associated files that have been uploaded with the clip.
- Tags. Metadata tags associated with the clip.
- Discussion. Read and enter comments about the current clip. Offensive comments can be reported. They are hidden from view until approved or deleted by an administrator.
- Chapters. Chapter points that have been created. You can creat new ones if you have the permissions to do so.
- Playlist. Create a playlist. You can add a clip or chapter point to the new playlist or an existing playlist.
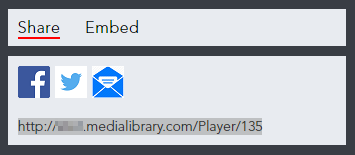
Sharing Clips
When you click the sharing icon, it expands and displays the sharing options, which for publicly available clips include Facebook, Twitter, and email. There is also a hypertext link to the clip that you be manually copy to the clipboard.
Clip Embedding Choices
Under Embed, the iframe embed code for the clip is displayed. To change the embed code to Javascript, check the box next to Use Javascript embed code. Sample code is shown here.
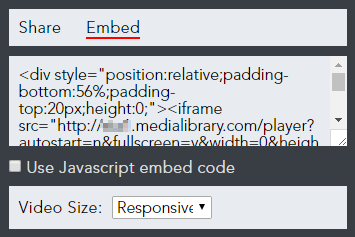
It is recommended to use the iframe embed code because it will offer the best level of compatibility across all the different devices. Javascript embed code should be used only for situations where the iframe code will not work.
Video Size Options
Using the Video Size drop-down box, you can change the size of the player in the embed code from the default of responsive to any of the following options:
- 320x260
- 640x385
- 835x505
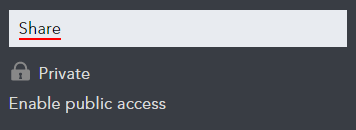
Enabling Public Access to Private Clips
If the clip is in a personal category, it will be private and it cannot be embedded or shared until you expressly allow access to it. Click Enable public access to change the status to public and allow it to be embedded.
iframe and Javascript Code Samples
Shown below are samples of embed code for iframe embedded code and Javascript (the embed code for each video or audio clip will be unqiue). If non-standard player sizes are used, the WIDTH and HEIGHT values (bolded in the following samples) are set according to the video size you selected.
iframe Embed Code
<iframe width="320" height="260" src="http://site.medialibraryserver.com/
player?autostart=y&fullscreen=y&width=320&height=260&videoId=9&quality=hi
&captions=y" frameborder="0" scrolling="no"></iframe>
Javascript Embed Code
<div id="player9">Loading Video Player....</div>
<script type="text/javascript"
src="http://site.medialibraryserver.com/player/getJsEmbedCode.aspx
?autostart=y&fullscreen=y&width=320&height=260&videoId=9
&quality=hi&captions=y">
</script>
Using Copy Code
Do the following to embed media within an external web site:
- Click anywhere in the code text box and press CTRL+C or right-click and select Copy. This places the code within the clipboard.
- Between the <body> and </body> tags of the web page or a blank work area of a virtual learning environment course, place the code by pressing CTRL+V or right-clicking and selecting Paste.
Player Controls
The player has controls that allow you to play and pause the clip.

- Each time you click the button that has the number 10 inside the circular arrow, the clip skips backward by 10 seconds.
- Seek through the clip by dragging the dot across the progress bar in either direction.
-
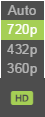
Playback uses adaptive bitrate streaming (ABR), meaning that the connection speed is detected and the appropriate bit rate is used to deliver the content. To change the quality manually, click the HD button and select an alternative option:
- Adjust the volume of the clip using the speaker icon, which can also mute the sound.
- The playback speed icon can alter the speed of playback:
- 0.5 or 0.8 (slow motion)
- 1.0 (normal speed, the default)
- 1.2, 1.5, or 2.0 (faster playback)
- Use the opposing arrows button on the right end of the controls to play the clip in full-screen mode.
Chapter Points
Chapter points divide a video into sections, allowing you to move between the sections quickly. If chapter points are enabled, there will be a Chapters area beneath the clip.
-
Click Chapters to open the Chapters area, displaying any existing chapters.
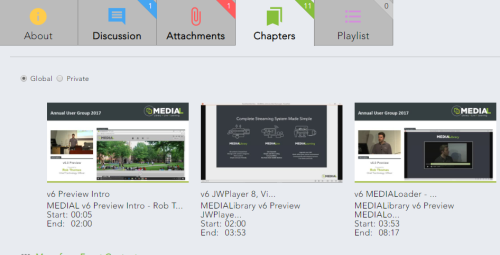
Use the radio buttons to toggle between Global or Private:
-
Global
Create global chapters if you want the chapters to be available to everyone who has access to the clip.
-
Private
Use private chapters to make the chapters viewable only to you.
-
-
If you have rights to create chapter points for a clip, the chapters control displays. To start a chapter, seek to the point where the chapter should start and click Start.

-
Allow the clip to continue playing or seek to the desired end point. Click End chapter to end the chapter, or End/start chapter to end the chapter and start a new one where this one finishes.

Click Cancel to stop the chapter creation process.
-
You can rename chapter titles and add descriptions as needed. Click the trash can icon to delete the chapter if you own the clip.
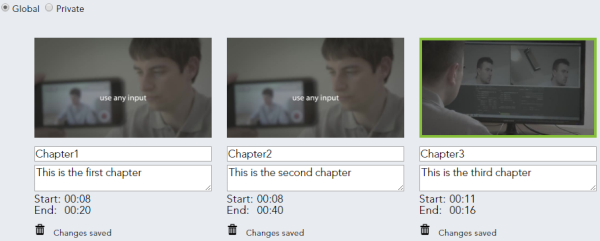
Administrators can use the trash can icon to delete chapters for other users.


Discussions
The discussion area allows you to write comments about a clip. Write a comment in the Add comment... text box and click Add comment.
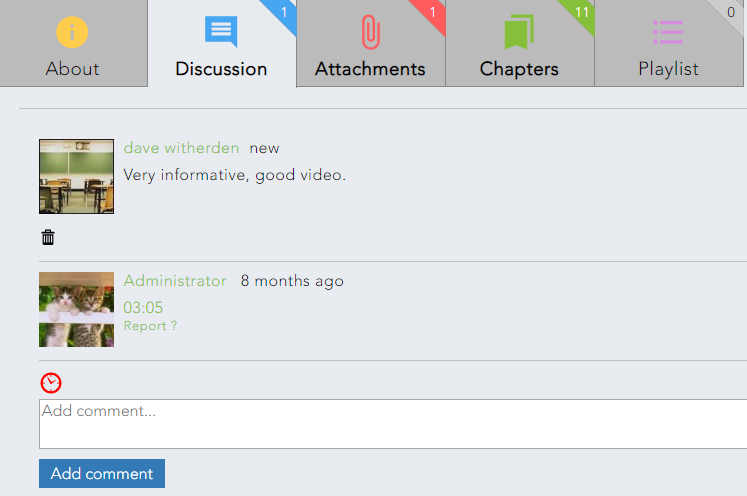
New comments appear above earlier comments in the discussion area.
Any comments deemed inappropriate or offensive can be reported to the administrator. Reported comments are hidden immediately.
Points of Interest
You can indicate a point of interest in a clip by seeking to that point and clicking the clock icon. Click Add comment to make the timeline value appear in the Discussion area.
Click the trash can icon to remove comments and time references. Only the user who wrote the comment or a system administrator can do this.
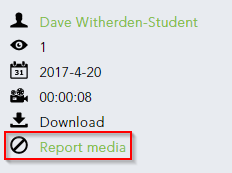
Inappropriate Content
Selecting Flag as Inappropriate displays a screen for reporting questionable content. Click the Report media link.
A drop-down list allows you to select the reason for concern. Enter a message that gives the reason for reporting the clip. When you click Send, the system administrator will receive a notification and will be able to delete the clip or reinstate it.
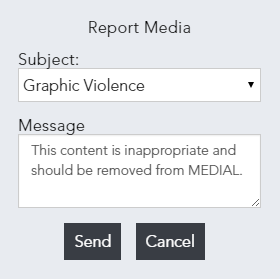
Flagged content is removed from view immediately and will not be available publicly until an administrator reinstates it.

|
©2025 Streaming Ltd | |