Brightspace Integration Guide
The following guide describes how to configure the Brightspace integration.
Create an LTI Key and Secret in MEDIAL
Log into MEDIAL as an administrator and navigate to the back end/upload site. From the main menu, click on the Security menu icon.

Expand the Learning Tools Interoperability accordion. Create a key and secret for use in Brightspace and note them down for later. Select the access level and then click Save.
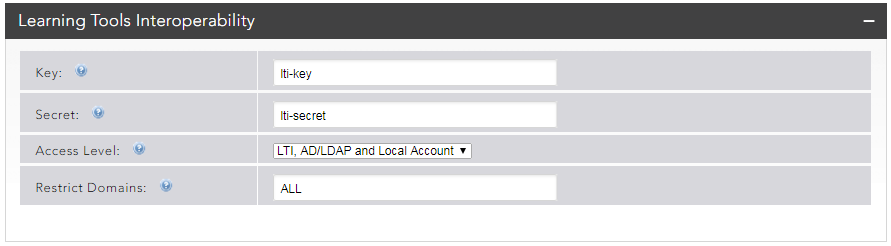
For more information on access levels and how they work in LTI, please see the Learning Tool Authentication Types section in the Security topic.
If there is more than one Brightspace system that requires LTI integration with MEDIAL, another key and secret needs to be created to avoid errors occurring. Please contact support@medial.com to request another key and secret to be set up.
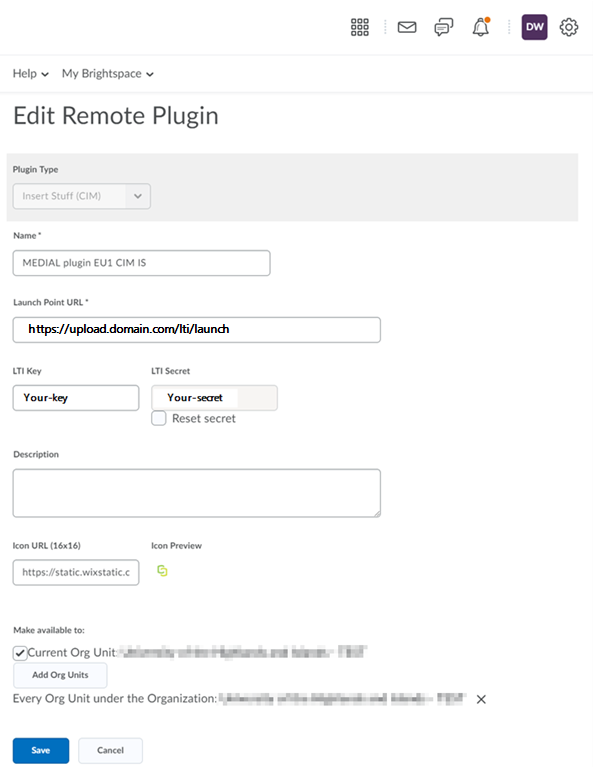
Configure the plugin in Brightspace
Log in to the administrator account, and click on the cog -> Organization Related -> Remote Plugins -> Add remote plugin
Enter in the following information:
- Name - provide a name for the plugin
- Launch Point URL - enter in the HTTPS host name of the MEDIAL upload site, followed by '/lti/launch', i.e. https://upload.domain.com/lti/launch
- LTI Key - the LTI key created in MEDIAL
- LTI Secret - the LTI secret created in MEDIAL
- Make available to - check the box to make it available to the current org unit.
Click on Save to save the changes.
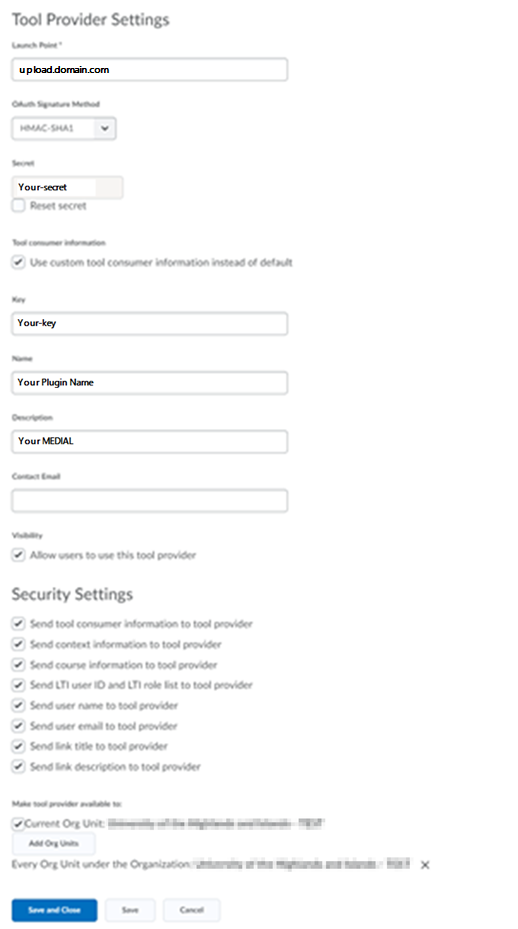
To configure the MEDIAL plugin:
Click the cog -> Organization Related -> External Learning Tools -> Manage Tool Providers -> [select your MEDIAL launch point]
Enter in the following information:
- Launch Point - enter in the MEDIAL upload site host name on its own, i.e. upload.domain.com
- Secret - enter the LTI secret created in MEDIAL
- Your consumer information - check the box to use custom tool consumer information
- Key - enter in the LTI key created in MEDIAL
- Name - enter in the name for your plugin
- Description - add in a description for the plugin
Check all of the check-boxes on the page and then click on Save and Close.

|
©2025 Streaming Ltd | |