MEDIAL Upgrade, Version 4
Before beginning the upgrade process, ensure that you have the installers and necessary license keys for both MEDIAL and the Wowza Media Server. If you need to obtain the latest version of the MEDIAL installer, log on to the self-service portal or contact the support team.
Back Up the VLS Database
Before upgrading MEDIAL, back up the database of user information.
Do not proceed without backing up the VLS database. If the upgrade fails, the database backup is necessary to roll back to the previous version.
If the host server is a virtual machine, take a snapshot in addition to performing the backup tasks described here. You can delete the snapshot once a successful upgrade is confirmed.
If you need to restore the database from a backup, refer to Restore the VLS database.
To back up the database:
-
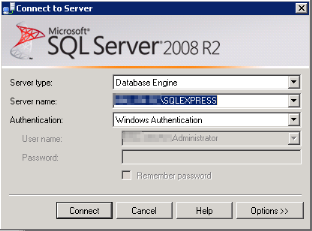
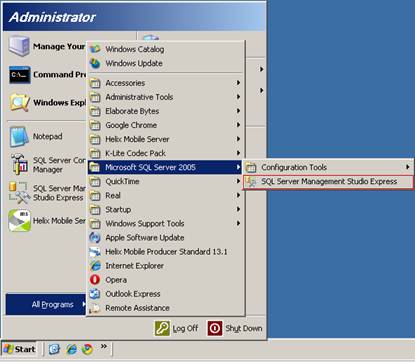
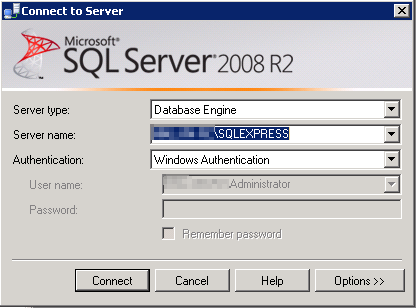
Open SQL Server Management Studio Express.

-
Click Connect to log in with an account that has full permission to access and back up the VLS database.
-
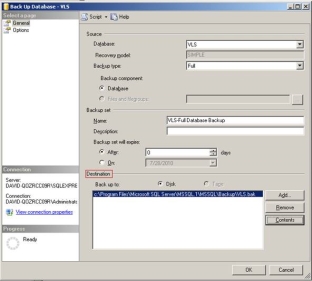
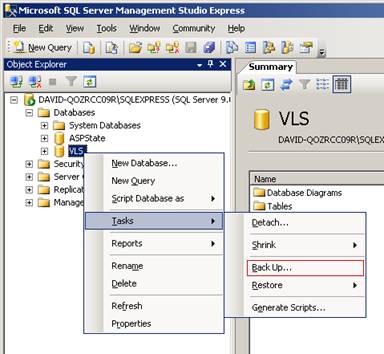
Expand the Databases folder to find VLS. Right-click and choose Tasks > Back Up.

-
In the backup dialog, verify the destination where the backup will be created. To change the destination, click Remove and Add, then enter a new path where the backup will be created.
-
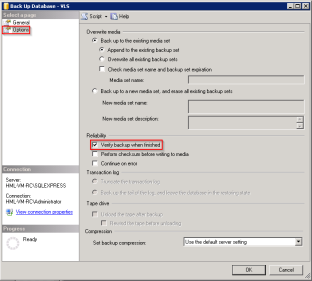
Click Options and check the box to Verify backup when finished.
- Click OK. When the backup completes, click OK on the notification box.
- Exit SQL Management Studio.


Back Up the Media Library
The existing media library must be backed up before you begin the upgrade.
If the upgrade fails, it is possible to restore the old version only if both the web sites and the database backups are present.
To back up the media library:
- Load Services by clicking Start > Run.
- In the box, enter services.msc and click OK.
-
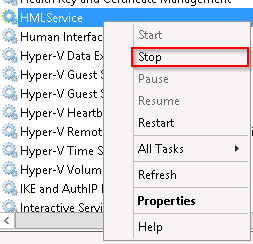
Locate and stop the HMLService by right-clicking it and selecting Stop.
-
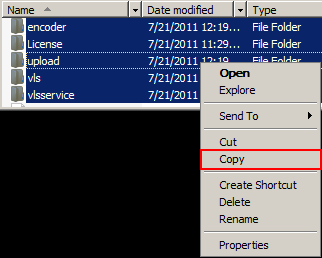
Locate your media library installation. The default location is C:\HelixMediaLibrary.
-
Copy the folders within the media library directory.
- Paste the files into a backup location.
Disable Helix Server and Install Wowza
Before installing Wowza Media Server, you must stop the existing Helix Server service and disable it. You can then install Wowza Media Server as the new streaming engine used by MEDIAL.
If Helix Server supports any other streaming appliances or applications, record the Helix Server settings before you disable the service so that you can recreate them in Wowza if necessary.
To replace Helix Server with Wowza:
- Log onto the Windows server that runs Helix Server.
- Open Services from Administrative Tools.
-
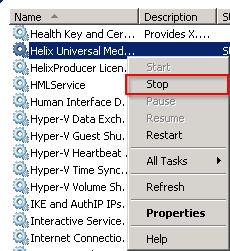
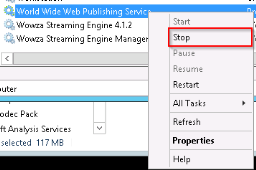
Locate the Helix Universal Media Server service and stop it by right-clicking the service name and choosing Stop.
-
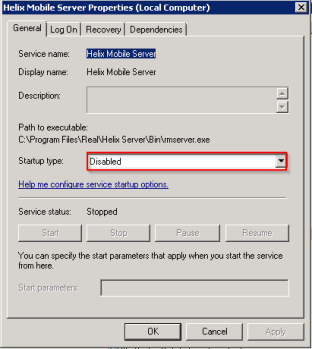
Double-click the service. On the General tab of the service properties dialog, change Startup type to Disabled.
- Click OK to exit.
- Install Wowza Media Server as described in the section Wowza Installation.
- After you have finished the Wowza installation, continue with the following instructions in this section. You will configure the Wowza Media Server after you upgrade MEDIAL.

Configure IIS Binding for HTTP Playback
Wowza Media Server delivers Flash content over RTMP port 1935. For audio and iOS playback, HTML5 will be delivered over port 80. For HTML5 playback and file downloads to work, you must bind the streaming URL to IIS.
To bind IIS for HTTP playback:
- On the Windows Server that runs IIS, open a command prompt with administrative privileges.
-
Run the following command using the IP address for Wowza Media Server:
Netsh http add iplisten ipaddress=x.x.x.x -
Restart IIS by issuing the following commands:
net stop http /y
net start http
net start w3svc - Close the command window.
-
Carry out the IIS configuration steps described in the section Configure HTTP Delivery.
- Continue with the instructions in this topic.
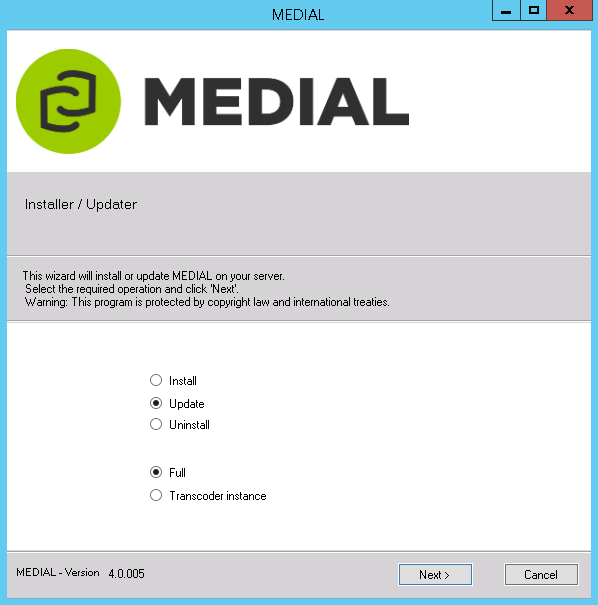
Upgrade the Media Library
After you have installed Wowza and prepared IIS, you can upgrade Helix Media Library to MEDIAL.
To upgrade the media library:
- Download the new installer and unzip the package if necessary.
- Launch the installer by right-clicking it and selecting Run as Administrator.
-
Select the Upgrade radio button and leave the installation type set to Full. Click Next.

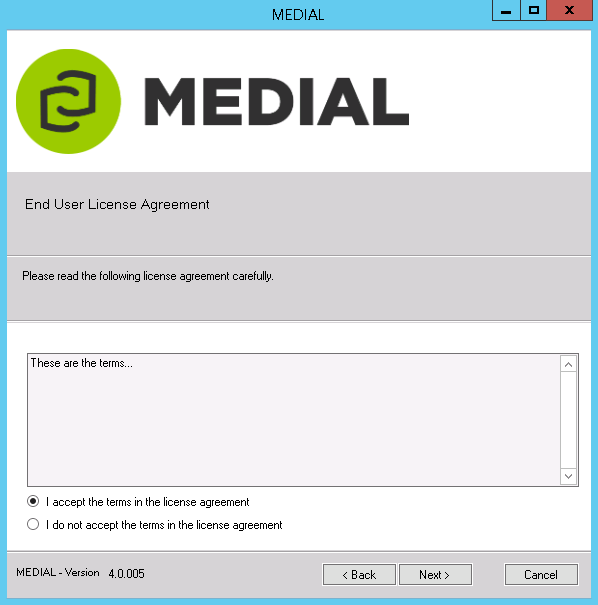
-
To proceed, click to radio button to accept the license agreement and click Next.

-
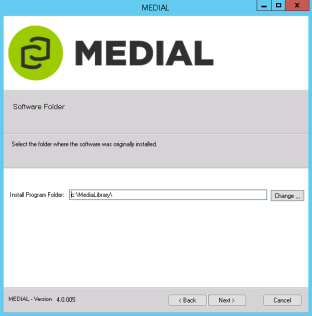
If the media library is installed in a different location from the default, click Change and locate it.
-
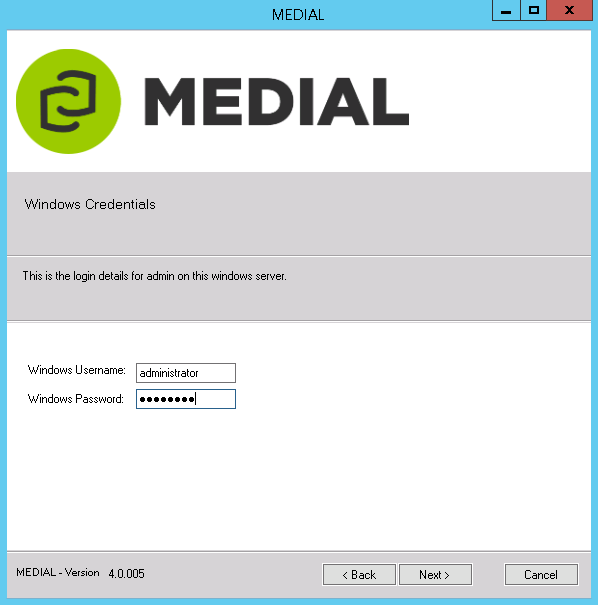
Supply the login credentials of an account that has permission to run the upgrade. If the account is a domain account, add the domain as a prefix as in domain/username. Click Next.

Use an account that does not expire. The chosen account will run the encoder scheduled tasks.
-
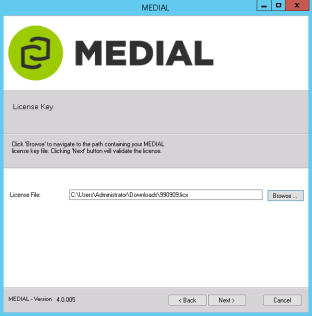
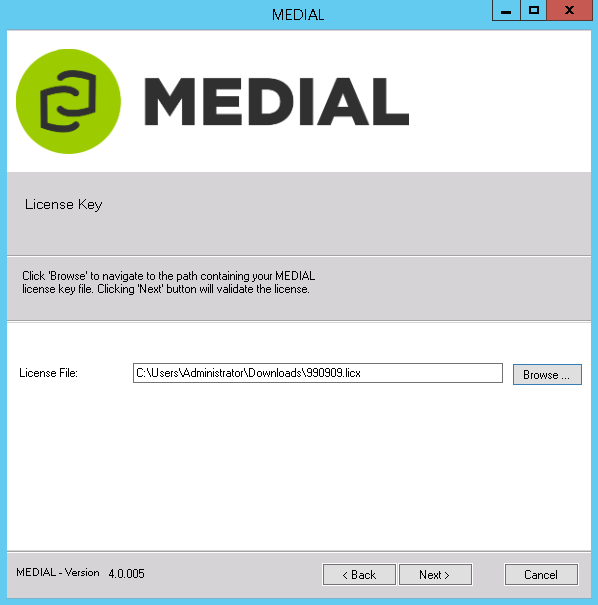
Click Browse and locate the MEDIAL license file. Select it and click Next.
-
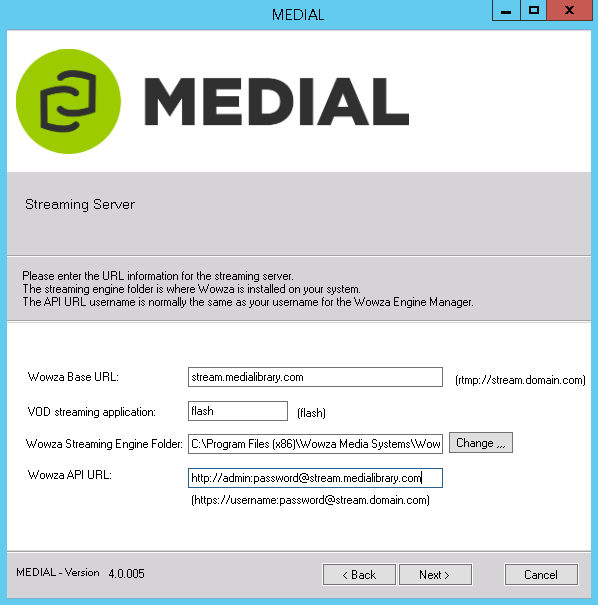
Enter the streaming information as described below and click Next.
- Wowza Base URL – URL used for streaming content.
-
VOD streaming application – Name of the application that MEDIAL uses to deliver Flash on-demand video content.
Unless you have a specific reason to use a different name, use the default application name flash.
-
Wowza Streaming Engine Folder
-
If you are installing Wowza Media Server on the same machine as MEDIAL, enter the full Windows path to the folder inside the main Wowza installation folder. In the following example from Windows Explorer, the folder name is shown as Wowza Streaming Engine 4.1.2.

-
If you are installing Wowza Media Server on a remote machine (that is, a server other than the one that hosts MEDIAL), enter the network path to the Wowza streaming engine folder. For example:

If a message says that the Wowza Server could not be contacted, ensure that either the Windows firewall on the Wowza Server is disabled or that port 1935 is open.
-
-
Wowza API URL – URL of the Wowza API that can extract playback statistics from the streaming server. The URL contains the login credentials in this form:
http://username.password@URL_to_Wowza_Server
-
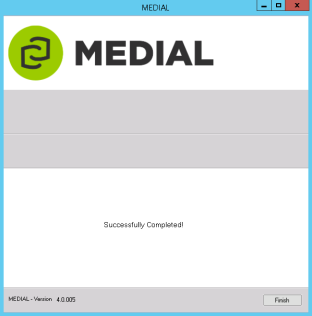
Click Finish once the upgrade is complete.
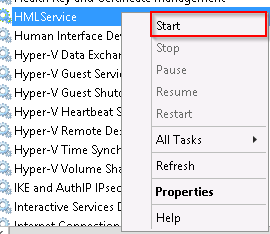
- Click Start > Administrative Tools > Services.
-
Right-click HMLServer, and choose Start.
-
Configure the Wowza Media Server as described in the section Wowza Configuration.
-
If you have additional, standalone transcoding instances, upgrade them as described in Upgrade an Existing Encoder.


Roll Back an Unsuccessful Upgrade
If the upgrade is not successful, you can roll back to the previous version of the media library using the backups you created.
- Click Start > Administrative Tools > Services.
-
Right-click HMLService, and choose Stop.

-
Navigate to the Helix Media Library installation directory and rename the current installation. For example, rename:
C:\MediaLibrary
to:
C:\HelixMediaLibraryFAILED
- Create a new directory to replace the prior installation directory (for example, re-create the C:\MediaLibrary). In this directory, restore the folders and files you backed up previously as described in Step of Back Up the Media Library.
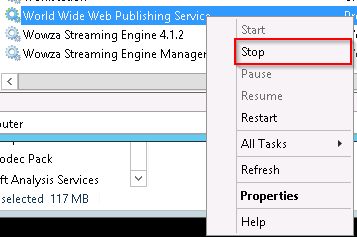
-
In the Services list, stop the World Wide Web Publishing service.
-
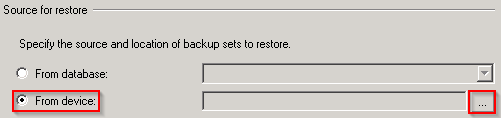
To restore the previous VLS database, log into SQL Management Studio and expand the server node, followed by the databases node. Right-click the VLS database, click Tasks > Restore > Database.
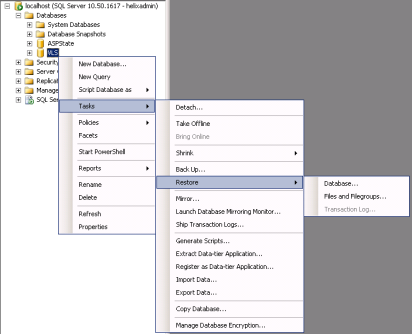
-
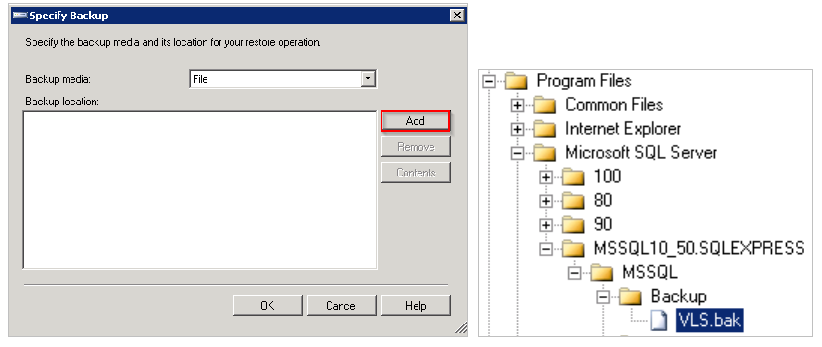
In the Restore Database window, choose the From device… radio button and select the backup made prior to upgrading.
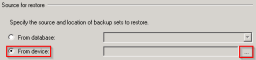
-
Locate the backup of the VLS database using the Add button.

-
Check the box in the Restore column for the backup once it has been selected.

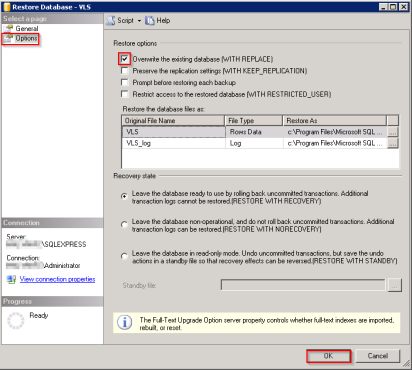
-
Click Options and check the box to Overrwrite the existing database (with replace). Click OK to restore the database.
- Exit SQL Management Studio.
- Load Services by clicking Start > Administrative Tools > Services.
- Start the services named World Wide Web Publishing and HML Service.
-
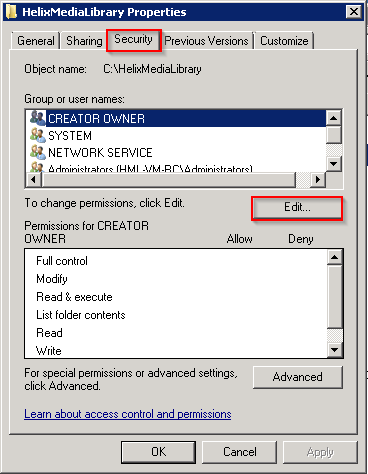
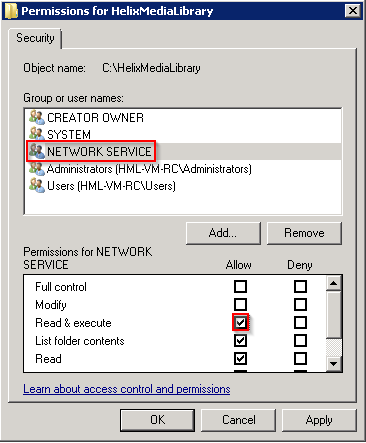
Set the permissions on the HelixMediaLibrary installation directory by navigating to it (for example, C:\HelixMediaLibrary), right-clicking it, and selecting Properties.
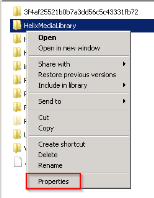
-
In the properties dialog, click the Security tab. Verify that the Network Service account is listed in the access list. If the account is present, ensure it has Read & Execute rights and skip to Step . If it is not present, proceed to the next step.

-
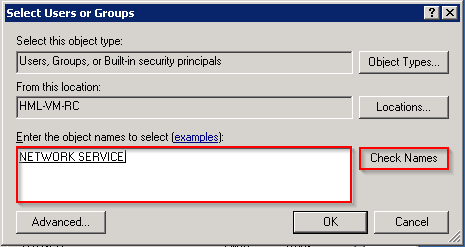
If the account isn’t present, do the following:
- Click Edit.
- In the window that appears, click Add,
-
Enter the name of the account (Network Service) and click Check Names. Click OK.

-
Select the Network Service account and check the box to allow Read & Execute permissions. Click OK.

- Click OK to exit.
- The HML restore should now be complete. Load the sites to check that they are working.


|
©2025 Streaming Ltd | |