Host Migration
If you intend to use the current media library IP addresses on the new host, it is OK to install the system using a single IP address on the target host. When you move operations over to the new host, add and bind the library IP addresses to the new host, replacing the interim IP.
Migration Checklist
Perform all of the following steps to prepare the new server for the migration:
- Prepare IIS and its associated features, including the Media Foundation feature.
- Install codec packs for K-Lite and QuickTime.
- Install SQL Express if using a local database.
- Install Wowza media streaming engine.
-
The target host for the migration must be running the same version of MEDIAL as the production system. If you intend to upgrade MEDIAL as well, perform the migration first, then upgrade the new host to the new MEDIAL version. Please contact support for assistance in determining the exact version you are on and to obtain the installer.
Back up and Copy Files
On the current server, the VLS database needs to be backed up and copied to the target server. Also, the content needs to be moved over unless the content is held on the network and accessed by its network path name.
Before proceeding with the following steps, ensure that no more content is uploaded to the media library by users. Content uploaded after the database is backed up will not appear in the media library following the migration.
Back up the VLS Database
Back up the VLS database on the production server:
- Backup instructions for MEDIAL version 7.
Once you have created the backup, exit SQL Management Studio and copy the backup file to the target server.
Copy Media Library Content
Locate the content directory of the media library and copy the entire directory to the target server. Depending on the MEDIAL version you are running, the folder will be called one of the following:
- HelixMediaLibraryContent
- MediaLibraryContent
Copy Auth DLL and Directory Services
If your instance of MEDIAL is using directory services authentication, the configuration information and the auth DLL file need to be backed up. Locate the installation directory of the media library. Depending on the MEDIAL version you are running, the folder will be called one of the following:
- HelixMediaLibrary
- MediaLibrary
Carry out the following steps:
- In this folder, open the subfolder vls.
- Copy the file web.config to the target server.
- Open the bin folder and copy of the Auth DLL file to the target server. This file name includes the version number in the name, as in Auth400R3.dll.
Migrate the Content and Database
Follow the procedures in this section to restore the content and the database to the target server.
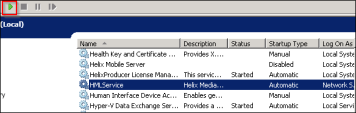
Stop Services
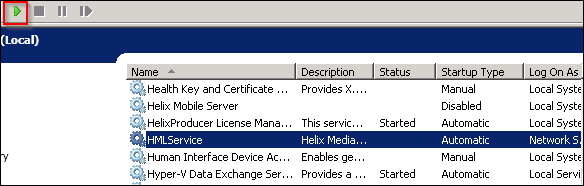
Before the database and content can be restored, stop the HMLService and World Wide Web Publishing services on the target server. Open Windows Services (Start > Administrative Tools > Services) and locate each service in turn, selecting them and clicking the stop button.
-
HMLService
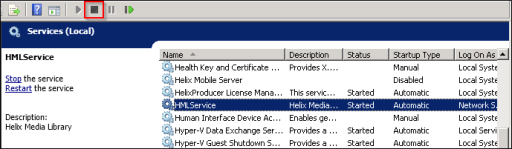
-
WWW Publishing service

After doing this, minimize the services window rather than closing it. You will use it again when you complete the migration.
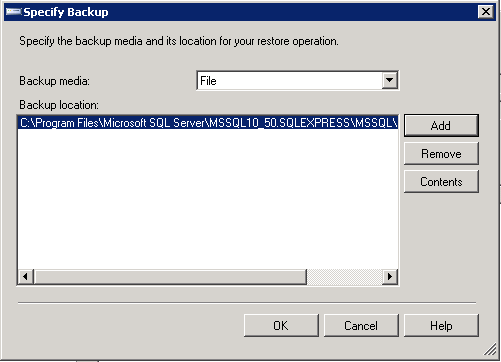
Restore the VLS database
On the target host machine, open SQL Management Studio and log in with administrator credentials. Follow the steps below to restore the VLS database to the new machine.
To restore the VLS database on the host machine:
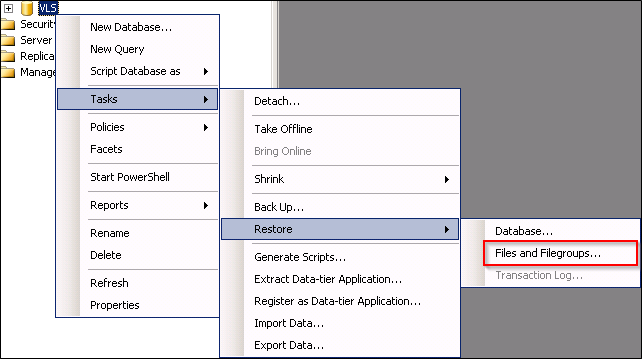
- Expand the Databases node and right-click on the VLS database.
-
Select Tasks > Restore > Files and Filegroups.

-
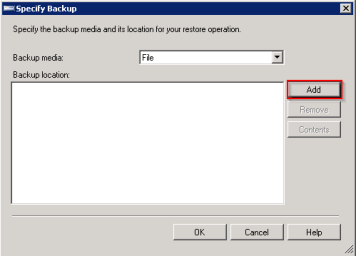
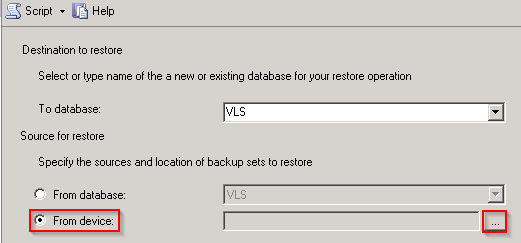
In the General area of the restore window, click the From device radio button and then click the ellipses to locate the VLS database backup from the current production server.

-
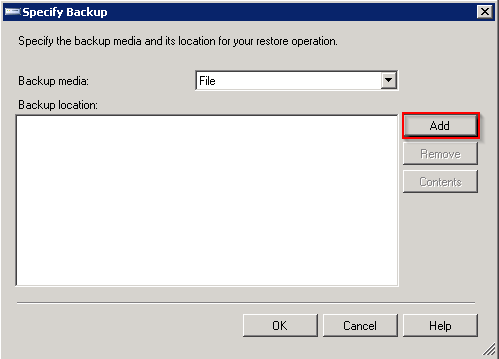
Click on the Add button in the window that appears.
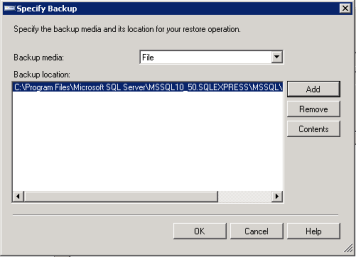
-
Locate the backup of the database called vls.bak. Select it and click OK.

-
Click OK to confirm the backup location.
-
Check the box next to the backup.

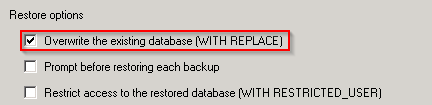
- In the top left corner of the restore window, click Options.
-
In the restore options area, check the box to Oerwrite the existing database WITH REPLACE. Then click OK to restore the database.
- Once the database is restored, click OK and close SQL Management Studio.

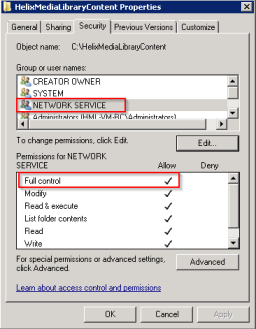
Restore Content
Follow these steps to move the media library content to the target server:
-
Locate the content directory on the target host server called one of the following:
- HelixMediaLibraryContent
- MediaLibraryContent
- Change the name of the directory by appending OLD to the end of the file name.
-
Copy the content directory from your live MEDIAL instance to this new location.
The name of the content directory must match exactly the one you are replacing.
-
Replace the permissions on the folder and restore the process by right-clicking the content directory, choosing the Security tab, and adding the Network Service account with full control.

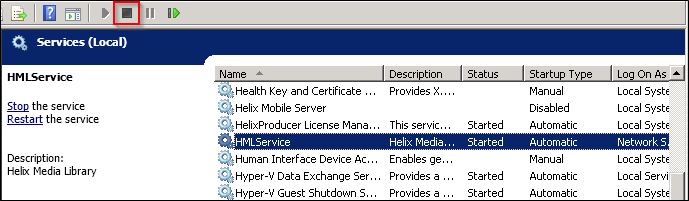
Complete the Migration
Follow these steps to compete the migration to the target server:
- Maximize the Services window from earlier.
-
Start both the HMLService and World Wide Web Publishing services by selecting them in turn and clicking on the small play arrow button.
- To move the service, the old server needs to be turned off or disconnected from the network and its IP addresses moved onto the new server. Once this has been done, bind the IP addresses to IIS.
- Open a command prompt as administrator. Where x.x.x.x is the IP address to be used by the MEDIAL sites in IIS, enter the following and hit return: netsh http add iplisten x.x.x.x
- Type 'net stop http /y' and hit return
- Enter 'net start http' and hit return
- Enter 'net start w3svc' and hit return. Exit the command prompt
-
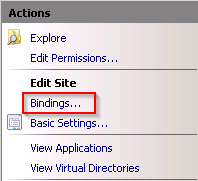
Open Internet Information Services Manager. Open the server node and click on the HML site. In the Actions window in the right-hand side of IIS Manager click Bindings.
-
Select the binding for the HML site and click Edit to change the IP address to the correct one.
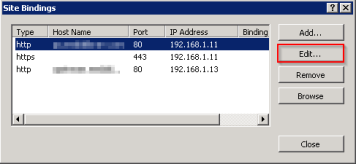
- Any SSL certificates should be imported and bound to the sites.
-
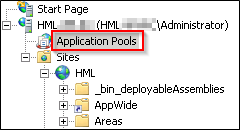
Once the binding changes have been made, click Application Pools in the left side of IIS Manager.
-
Check that the Helix application pool is set to use the Network Service account.

-
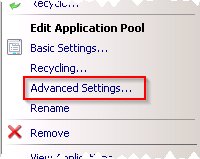
If it is not set correctly, select it and choose Advanced Settings from the right-hand side of the window.
-
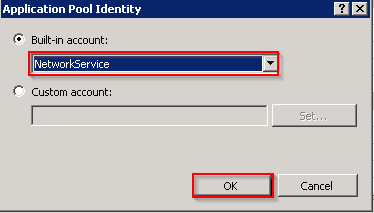
Under the Process Model section, click the box containing the account you need to change. Then click the ellipses.

-
Choose Network Service from the Built-in account drop-down. Then click OK.
-
-
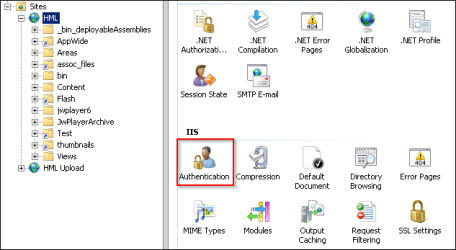
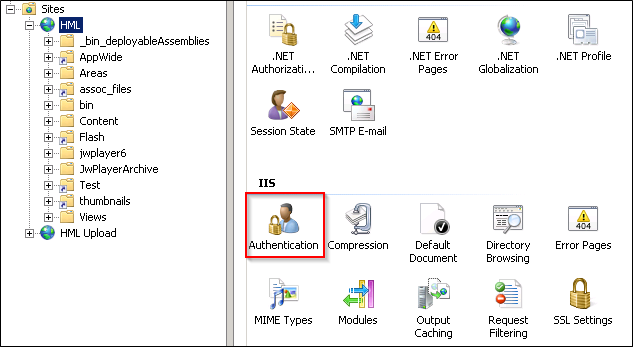
Click the HML website in the left-hand side of the window. Double-click Authentication.
-
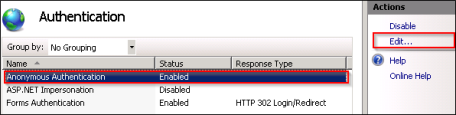
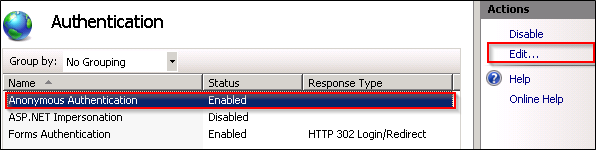
Click Anonymous Authentication. In the right side of the window, click Edit.
-
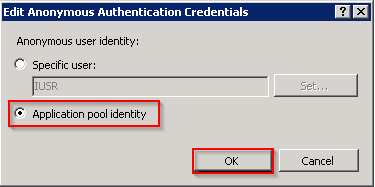
Set the site to use the application pool identity by selecting that radio button and clicking OK.
- Repeat the process for the HML Upload site.


Enable Directory Services Authentication
Follow these steps to enable authentication on the target server:
- Locate the copies of the web.config and Authxxx.dll files.
- Navigate to the installation directory called either HelixMediaLibrary or MediaLibrary depending on the version installed.
- In this folder, open the subfolder vls.
- Open the bin directory and paste in the auth DLL file.
- Go back to the vls folder and open the web.config file.
- Open the web.config file copied from the live media library server and copy over everything in the <appSettings></appSettings> section.
- Save the file.
- Repeat the process for the upload site in the folder called upload, copying the auth DLL file into that bin folder too.

|
©2025 Streaming Ltd | |